
Most of us fix our desk setup only after something feels off, like a tight shoulder or tired wrists by mid-afternoon. Keyboard and mouse placement ergonomics is one of the easiest places to start. You use these two devices for hours at a time, so small positioning problems can become part of your daily routine.
This guide explains where to place your keyboard and mouse, how high they should sit, and how to keep your wrists in a comfortable, neutral position. It also covers small desks, laptops, common mistakes, and a step-by-step checklist you can follow at your own desk. You won’t need to buy anything.
Quick Answer
Good keyboard and mouse placement ergonomics comes down to four habits. Put the keyboard directly in front of you. Keep the mouse right next to it, at the same height. Set both near elbow height so your shoulders stay relaxed and your upper arms stay close to your body. Keep your wrists as straight as you comfortably can. Adjust your chair and desk first, and use a keyboard tray or accessories only if those adjustments don’t get you there.
What Is an Ergonomic Keyboard and Mouse Position?
An ergonomic keyboard and mouse position is a setup where your arms, wrists, and shoulders can stay in a relaxed, neutral posture while you work. “Neutral” means your joints sit near their natural middle range instead of being pushed to the edge of their movement.
For typing and mousing, that usually looks like this:
- Shoulders relaxed, not hunched.
- Elbows close to your sides.
- Forearms roughly parallel to the floor.
- Wrists straight, in line with your forearms.
OSHA’s computer workstation guidance describes the goal as reducing awkward postures, repetition, and contact stress. OSHA’s keyboard guidance notes that no setup removes repetition entirely, so posture and regular breaks both matter.
There’s no single perfect position for everyone. Body size, desk height, and the work you do all change the answer. Treat the numbers in this guide as starting points and adjust from there.
Where Should Your Keyboard Be Positioned?
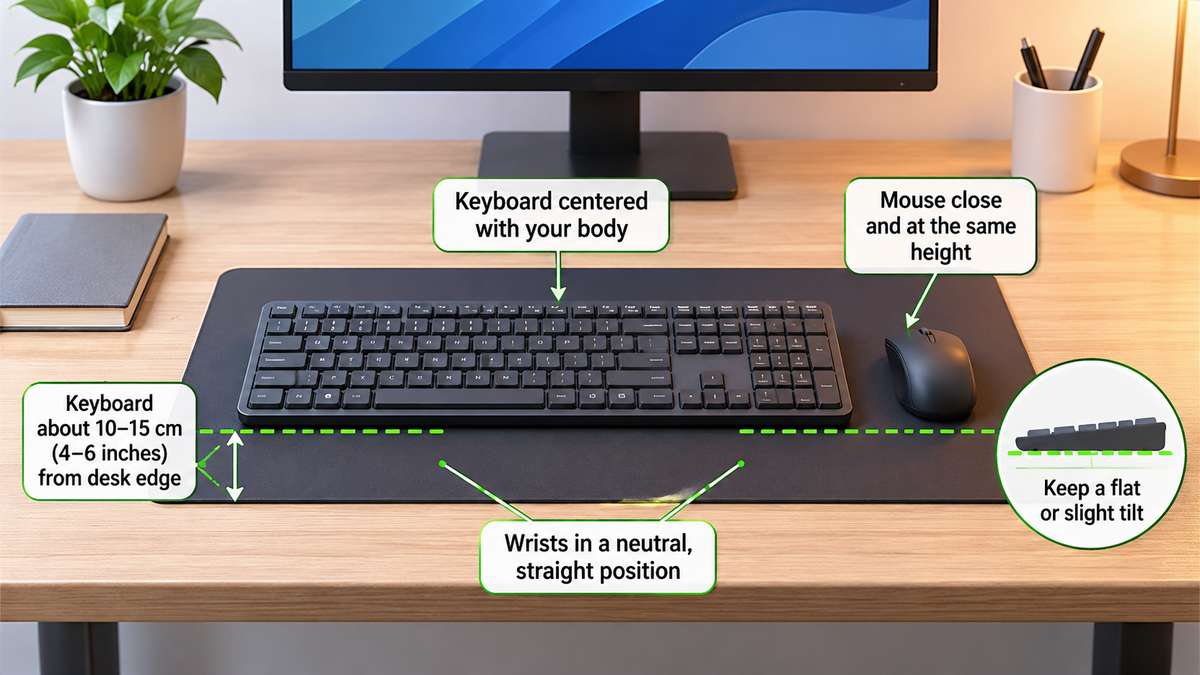
Put your keyboard directly in front of you, centered on your body, at a distance that lets your elbows stay close to your sides. Then check height, tilt, and spacing from the desk edge.
Alignment With Your Body
Center the keyboard with your screen and your torso so you don’t twist. The UK Health and Safety Executive (HSE) lists a central screen and keyboard among its basics for good posture. A practical check is to keep the keyboard centered in front of your torso rather than reaching or twisting to one side.
Distance From You
Your forearms should sit roughly parallel to the floor, with your elbows near your body. OSHA describes both extremes as problems. A keyboard too far away pulls you into reaching and leaning. One too close can force awkward elbow angles.
Leave enough space between the keyboard and the desk edge to support your forearms comfortably without pressing your wrists against a hard edge. A specific distance is only a starting point; your arm length, desk depth, and typing posture matter more.
Elbow and Shoulder Position
If you notice your shoulders rising toward your ears, your keyboard may be too high, or your chair too low. HSE specifically advises relaxing your shoulders and sitting high enough that you don’t shrug.
Keyboard Height
The two agencies phrase this a little differently. OSHA says elbows should be about the same height as the keyboard. HSE says the keyboard should sit just below elbow height. In practice, both describe the same zone. Your forearms should be level or tilted very slightly, with your hands resting naturally on the keys.
Keyboard Tilt
OSHA’s guidance is practical here. The goal is a straight wrist, and the right tilt depends on how your keyboard height compares with your arms. If you sit lower than the keyboard, raising the back slightly may help. If the keyboard sits low, raising the front may help. OSHA also advises skipping the keyboard’s flip-out feet if they make your wrist bend more.
A simple test: Look at your wrist from the side while typing. If the back of your hand tips upward from your forearm, change the tilt or height until the line looks straight.
Where Should Your Mouse Be Placed?
Place your mouse right beside the keyboard, at the same height, so you can use it without stretching your arm. Both OSHA and WorkSafe Queensland recommend keeping it close and level with the keyboard. HSE suggests placing it in line with your elbow.
Avoid Reaching
OSHA notes that a mouse placed too far away can leave your arm held away from your body, which loads your shoulder and forearm over time. Many people don’t notice it, because the reach feels normal after a few weeks.
Right-Handed and Left-Handed Users
- Right-handed users: Many full-size keyboards have a number pad on the right, which pushes the mouse further from your body. A compact keyboard without the number pad brings it closer. OSHA lists this as an option.
- Left-handed users: Place the mouse on the left, and use a mouse designed for left-hand use or one that works in either hand. OSHA notes that using a device built for the other hand can create awkward force and posture.
- Everyone: OSHA suggests alternating hands if you can. Even occasional switching gives your dominant hand a rest.
Mouse Size and Grip
OSHA says a mouse that is too large or too small can lead to awkward wrist positions and extra finger force. If your hand is working to grip it, the size may be wrong for you. Try a few if you can. Keep the grip light as well. A tight clench adds tension without improving control.
Check your pointer speed, too. OSHA recommends settings that let you control the mouse with a light touch and cover the screen without bending your wrist.
How High Should Your Keyboard and Mouse Be?
Set your keyboard and mouse at about elbow height, on the same level. The cleanest way to get there is to adjust your chair first and your desk second, and only then add a keyboard tray.
| Step | What to adjust | What you’re aiming for |
| 1 | Chair height | Elbows near keyboard height, shoulders relaxed |
| 2 | Footrest (if needed) | Feet supported if raising the chair lifts them off the floor |
| 3 | Desk height | Keyboard and mouse surface at or just below elbow height |
| 4 | Keyboard tray (if needed) | Adjustable height and tilt, with room for both devices |
Steps 1, 3, and 4 follow OSHA and HSE guidance. The footrest step is a practical addition.
Here’s why the order matters. If your desk is too high, you can raise your chair to match your elbows. Then your feet may dangle, and a footrest can help with that. Our guide to how desk chair height affects leg comfort and circulation covers this trade-off in more detail.
If you can’t adjust the chair or desk enough, OSHA suggests a keyboard tray. It should adjust in height and tilt, leave room for your legs, and be large enough for both keyboard and mouse. A tray too small for the mouse defeats the purpose.
Don’t forget your screen. If your neck is working hard, the problem may be above your hands. See how high your monitor should be to check it.
How to Maintain a Neutral Wrist Position
A neutral wrist is straight, in line with your forearm, and not bent up, down, or sideways. OSHA describes bent wrists during repetitive typing as a source of contact stress on the tendons that run through the wrist.
Common Wrist Bends
- Bent up (extension): Often from a keyboard that’s too low or tilted too steeply.
- Bent down: Often from a keyboard set too high, or from resting heavily on the desk edge.
- Bent sideways: Often from a standard keyboard that’s too narrow for your shoulder width, or from reaching for keys at the edges.
Wrist and Palm Supports
OSHA describes wrist rests as a way to encourage neutral posture, and also warns that sharp, hard edges can create contact stress on the forearm and wrist. Choose a soft, rounded edge if you use one.
A wrist rest should not become a hard surface against which you press your wrists while actively typing. Keep your wrists as straight as possible and allow your hands to move freely. During pauses, a properly positioned, soft-edged rest may provide support. OSHA emphasizes neutral posture and cautions against pressure from hard or sharp edges. A wrist rest is a comfort accessory, not a treatment for any condition.
Alternative Keyboards
Split and tented keyboards can help some people hold a neutral wrist. OSHA adds that research hasn’t conclusively shown they prevent discomfort or injury, and that users may need time to adapt. If you’re curious, try one before committing.
Keyboard and Mouse Setup for Small Desks
A small desk can still support a comfortable setup if you free up space directly in front of you and keep the items you use most within easy reach.
- Choose a compact keyboard. A keyboard without a number pad leaves more room for your mouse. OSHA lists this as a way to limit reaching.
- Clear the front edge. Move notebooks, drinks, and chargers to the sides or onto a shelf. Your keyboard and mouse should have the most room.
- Use keyboard shortcuts. Shortcuts like Ctrl+S and Ctrl+P reduce how often you reach for the mouse. OSHA recommends this too.
- Consider a keyboard tray. OSHA notes a tray can help when desk space is limited. Make sure it’s wide enough for both devices.
- Put occasional items farther away. Keep the phone, notebook, and headphones outside your main reach zone.
- Match the desk to your arms. If the desk surface is too thick or has a center drawer that blocks your thighs, OSHA suggests removing the drawer where possible.
Laptop Keyboard and Mouse Placement
A laptop keeps the screen and keyboard attached. If the screen is at eye level, the keyboard is usually too high. If the keyboard is at a comfortable height, the screen is usually too low. That compromise is why long laptop-only sessions can be tiring.
Both HSE and WorkSafe Queensland recommend a separate keyboard and mouse for extended laptop use. HSE’s laptop illustration also shows the screen raised on a stand. OSHA adds that smaller keyboards, such as those on laptops, may contribute to stressful postures.
Here’s a simple way to approach it:
- Occasional use: A laptop on its own may be practical for brief tasks. Take movement breaks and change position rather than holding one posture.
- Regular or prolonged use: Add an external keyboard and mouse, then raise the laptop screen to a comfortable viewing height with a stand or a stable stack of books. This lets you position the screen and input devices independently.
Common Keyboard and Mouse Placement Mistakes
| Mistake | Why it matters | Fix |
| Mouse too far to the side | Pulls the arm away from the body | Move it right beside the keyboard; use a compact keyboard if needed |
| Keyboard too high | Can push your shoulders up | Raise your chair, or lower the keyboard |
| Keyboard too low | Can bend your wrists upward | Raise the desk surface or the keyboard |
| Steep keyboard feet | Can angle the wrist upward | Fold them in if your wrist bends |
| Keyboard off-center | Causes twisting | Align it with your screen and torso |
| Keyboard and mouse on different levels | Forces the arm up and down | Put both on the same surface |
| Gripping the mouse tightly | Adds unnecessary tension | Loosen your grip; lower pointer sensitivity if needed |
| Resting wrists on a hard edge | Can create pressure on the forearm | Rest your forearms on soft surfaces or float your hands |
How to Adjust Your Keyboard and Mouse Setup Step by Step
Follow this checklist at your desk. It takes about ten minutes.
- Sit back in your chair with your feet supported and your back resting comfortably.
- Relax your shoulders. Let your arms hang by your sides.
- Bend your elbows to about a right angle and note where your hands land. That’s your target height.
- Adjust your chair so your forearms are roughly level with the desk surface.
- Support your feet with the floor or a footrest if raising the chair lifted them.
- Center the keyboard on your body and screen, with room for your forearms at the desk edge.
- Place the mouse next to the keyboard on the same level, in line with your elbow.
- Check your wrists from the side. Adjust the keyboard tilt until they look straight.
- Test your reach. If you stretch for the mouse, move it closer or switch to a more compact keyboard.
- Work for a few days and fine-tune. Small changes often show their value over a full workday.
Pair this with regular movement. OSHA suggests a short break from computer tasks about every hour. Our guide to desk habits that keep your legs healthy has simple ideas, and our walkthrough of the correct sitting position for all-day desk work covers the rest of your posture. For your lower body, see how to position your feet correctly at a desk.
Frequently Asked Questions
How close should a mouse be to a keyboard?
As close as you can comfortably manage, on the same level. OSHA and WorkSafe Queensland both recommend keeping the mouse close and parallel to the keyboard. If your keyboard has a number pad, a compact model gives you extra room.
Should a keyboard be flat or tilted?
It depends on keeping your wrist straight. OSHA says to adjust the tilt to fit your height relative to the keyboard, and to avoid keyboard feet if they bend your wrist more. Many people find a flat or lightly tilted keyboard works well. Check your wrist from the side to decide.
How high should a keyboard be?
About elbow height. OSHA says elbows should sit near keyboard height, and HSE says just below elbow height. Both mean your forearms should be roughly level and your shoulders relaxed.
Should wrists rest on a wrist rest while typing?
Not necessarily. A wrist rest is usually most useful as a place to pause between typing bursts. OSHA notes that wrist rests are meant to support neutral posture and that hard edges can create pressure. Floating your hands lightly while typing keeps your wrists straight for most people.
Can a small desk support an ergonomic setup?
Yes. A compact keyboard, a cleared front edge, keyboard shortcuts, and keeping occasional items out of reach can all help. If the desk is too small for both devices on one level, a keyboard tray can add space.
Is a separate keyboard necessary for laptop users?
For short or occasional use, not always. For regular or long sessions, HSE and WorkSafe Queensland both recommend a separate keyboard and mouse, with the screen raised. This lets you set the screen and keyboard at different, comfortable heights.
Key Takeaways
- Center the keyboard in front of you and keep your elbows close to your body.
- Keep the mouse next to the keyboard, on the same level, and avoid reaching.
- Set both near elbow height, adjusting your chair before your desk.
- Check your wrists from the side and adjust tilt to keep them straight.
- A compact keyboard, a clear desk edge, and shortcuts help on small desks.
- For long laptop sessions, use a separate keyboard and mouse with a raised screen.
- Take regular short breaks. Posture helps, but movement matters too.
Conclusion
Good keyboard and mouse placement ergonomics is mostly about keeping things close, level, and near elbow height, with straight wrists and relaxed shoulders. You can usually get there by adjusting your chair, desk, and the position of your devices.
Spend ten minutes going through the checklist at your own desk, then give the changes a few days. If you notice persistent pain, numbness, or tingling in your hands or wrists, it’s a good idea to talk with a qualified healthcare professional. A workstation adjustment is not a substitute for medical advice.
Sources: OSHA: Keyboards · OSHA: Pointer/Mouse · HSE: Good posture when using DSE · WorkSafe Queensland: Setting up your workstation